

Explore All Features of the SolveFX Excel Utility Add-In
The SolveFX Utility provides many unique features above and beyond those offered natively in Microsoft Excel. Once installed, the SolveFX Utility Excel Add-In will automatically create a new tab in Excel through which to access all features.

Solvefx utility Excel interface screenshot
Power Fill
Automates the process of filling blank cells between unique cell values either down by row or across by column. This feature finds the first non-blank cell and copies that cell's content down until the next cell containing unique data is found and so on until the entire selected range is filled. Formulas can be optionally ignored. This feature is especially useful if creating a normalized set of data or if using the Excel Data Filter.
Options
1. Filling Down Each Column by Row
2. Filling Across Each Row by Column

Power fill feature screenshot
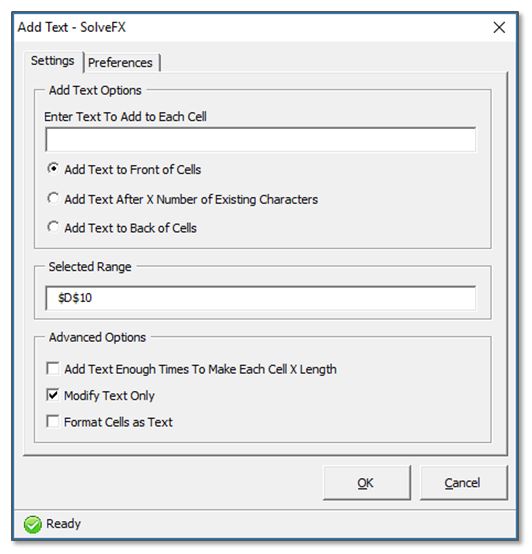
Add Text
Automates the process of adding specified additional text to existing text or values. The Add Text feature will append specified text to existing text in a selected range using various methods that you define. If blank cells are included in the selected range, these cells will not be changed or text added to them. Multiple columns and rows can be included in the range as long as the range is contiguous.
Options
1. Add Text to Front of Cells
2. Add Text After X Number of Existing Characters
3. Add Text to Back of Cells
Advanced Options
1. Add Text Enough Times to Make Each Cell X Length
2. Modify Text Only
3. Format Cells as Text
Add text feature Screenshot
Delete Text
Automates the process of removing specified text from existing text in a selected range using various methods that you define. The text entered in the 'Enter Text to Delete From Each Cell' field is case sensitive and will be removed from existing text based on the case of the text that you enter and define to be removed. Multiple columns and rows can be included in the range as long as the range is contiguous.
Options
1. Delete Text From Front of Cells
2. Delete Text From Any Location in Cells
3. Delete Text From Back of Cells

Delete text feature screenshot
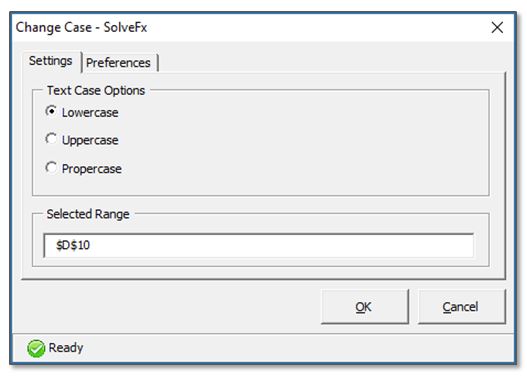
Change Case
Automates changing the case of the selected text. Multiple columns and rows can be included in the range as long as the range is contiguous. The entire worksheet can also be selected if the changes are intended to be global in nature.
Options
1. Lowercase
2. Uppercase
3. Propercase
change case feature screenshot
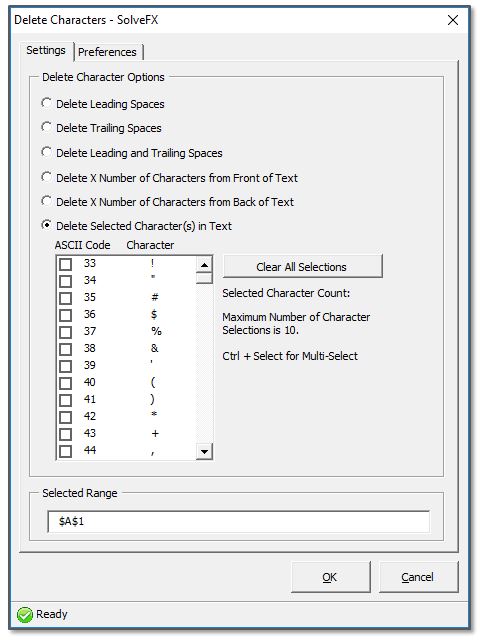
Delete Characters
Automates removing multiple specified characters from existing text in a selected range using various methods that you define. Multiple columns and rows can be included in the range as long as the range is contiguous. The entire worksheet can also be selected if the changes are intended to be global in nature.
Options
1. Delete Leading Spaces
2. Delete Trailing Spaces
3. Delete Leading and Trailing Spaces
4. Delete X Number of Characters from Front of Text
5. Delete X Number of Characters from Back of Text
6. Delete Selected Character(s) in Text
Delete characters feature screenshot
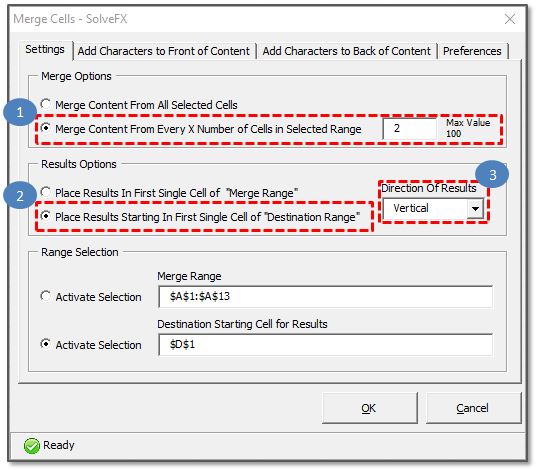
Merge Cells
Automates the process of merging the content from multiple cells into a single cell or multiple cells each containing a specific number of cell merged content. For example, taking a list of 100 values/text and making a new list of the same values/text where each cell in the new list contains 2 sequential values from the original list combined together in each cell. In addition, you can specify a combination of characters to be added to the front and/or back of each new cell value as part of this process.
The following are before and after screen shots of one of the merge options to illustrate this feature.
Example Settings
1. Merge every 2 cells in the selected range (Range $A$1:$A$13) into a new destination range starting on cell $D$1.
2. Placing the results starting in the first cell of the Destination Range
3. Results will be populated vertically.
Merge cell feature screenshot
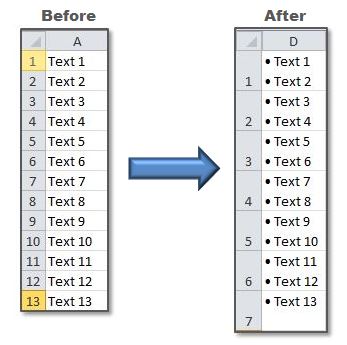
merge cell feature Before and after screenshot
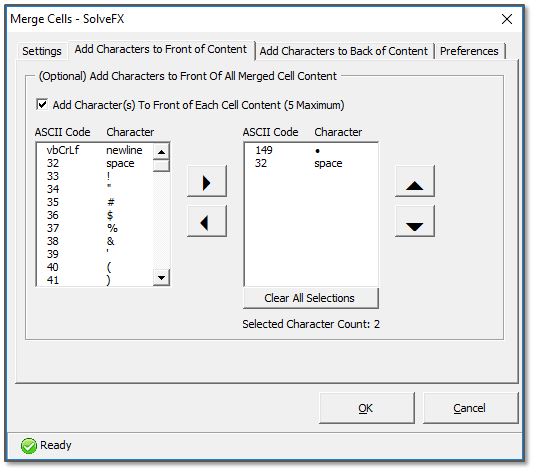
merge cells feature screenshot to add characters to the front of merged content
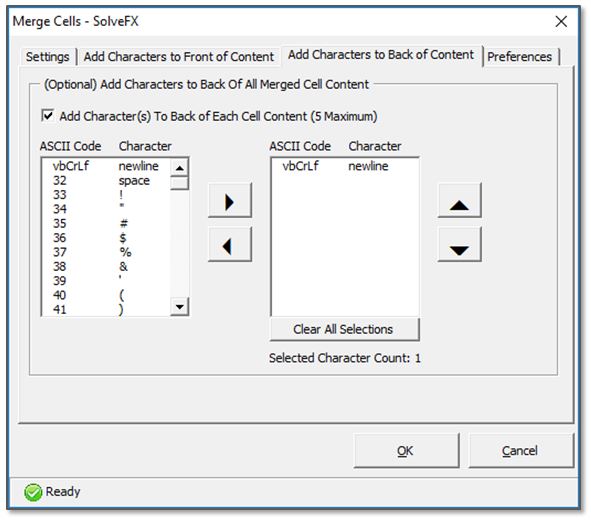
Merge cells feature screenshot to add characters to the back of merged content
Un-Hide / Hide Sheets
The (Un) Hide Sheets feature automates the process of hiding or un-hiding multiple worksheets within the same unprotected workbook at the same time. This feature will still work if the workbook structure is un-protected but worksheets within that same workbook are protected.

(un) Hide sheets feature Screenshot
Consolidate
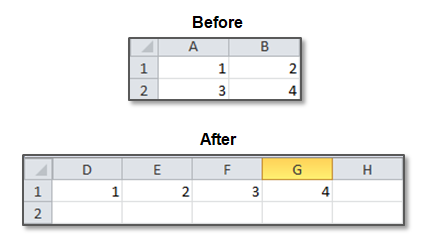
The Consolidate cells feature automates the process of transforming the arrangement of existing values or text from a range containing multiple columns and rows (e.g. $A$1:$B$2) into a single row (e.g. $D$1:$D$4) or single column (e.g. $D$1:$G$1) that contains these same original values or text in order. This provides unique functionality beyond that offered via Excel’s Transform feature.
The following are before and after screen shots after applying one of the consolidation options to illustrate this feature. In this example, the consolidation feature transforms the arrangement of existing values or text from a range containing multiple columns and rows (e.g. $A$1:$B$2) into a single column (e.g. $D$1:$D$4).

single column Before and after example
The following are before and after screen shots after applying another of the consolidation options to again illustrate this feature. In this example, the consolidation feature transforms the arrangement of existing values or text from a range containing multiple columns and rows (e.g. $A$1:$B$2) into a single row (e.g. $D$1:$G$1).
single row Before and After example
Within the consolidate feature, options are provided about how the original range of values / text is to be ordered when converted to a single row or single column.
Option 1: “Process Selected Range Across by Row”.
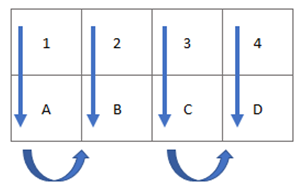
This option processes the original range across by each row and then down to the next subsequent row in the original range. In this example, the order of the results would be 1 2 3 4 A B C D

option 1: processing order example
Option 2: “Process Selected Range Down by Column”.
This option processes the original range down each column and then across to the next subsequent column in the original range. In this example, the order of the results would be 1 A 2 B 3 C 4 D
option 2: processing order example
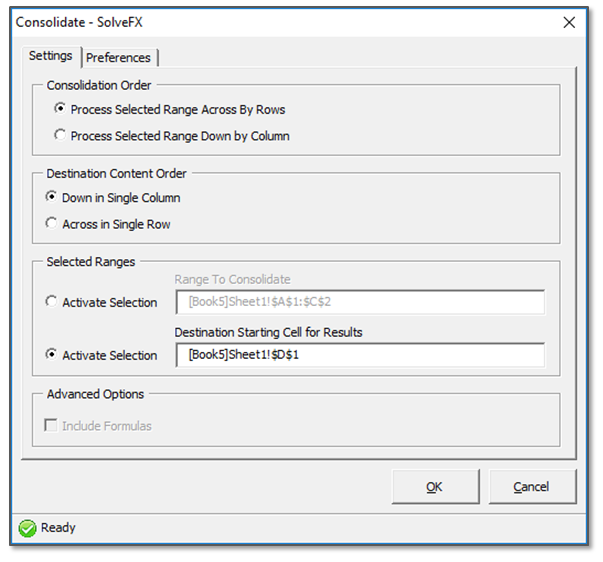
consolidate feature screenshot
Concatenate
The Concatenate feature automates the process of combining the content of multiple cells together. Optional custom text can be defined to be added to the front, back and as delimiting text between the combined cell content. Options are available to combine all the content in the entire range or combine all content by row or by column.
The following are before and after screen shots of applying one of the concatenate options to illustrate this feature. In this example, the concatenate feature combines the existing values or text from a range (e.g. $A$1:$C$2) by row and places the results into the first cell of each row of the original selected range (e.g. $A$1:$A$2). Note that content in all of the remaining cells of the selected range will be removed. Options within the Concatenate Feature allow you define:
- Leading character(s) (e.g. “[“),
- Delimiting character(s) (e.g. “, “)
- Ending character(s) (e.g. “]”).
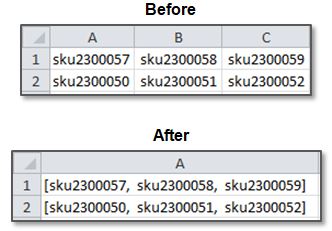
Concatenate Feature Before and after example

concatenate feature screen shot
Other options available for this feature include:
Entire Selected Range: This option combines all cell values in the selected range together and places the entire result in the first cell of the selected range.
Across Each Selected Row: This option combines all cell values across each individual row and places the result in the first cell of each row in the selected range.
Across Each Column: This option combines all cell values down each individual column and places the result in the first cell of each column in the selected range.
Additional options exists to include leading, delimiter, and ending characters to the results as well as option to remove spaces and ignore formulas.
Normalize
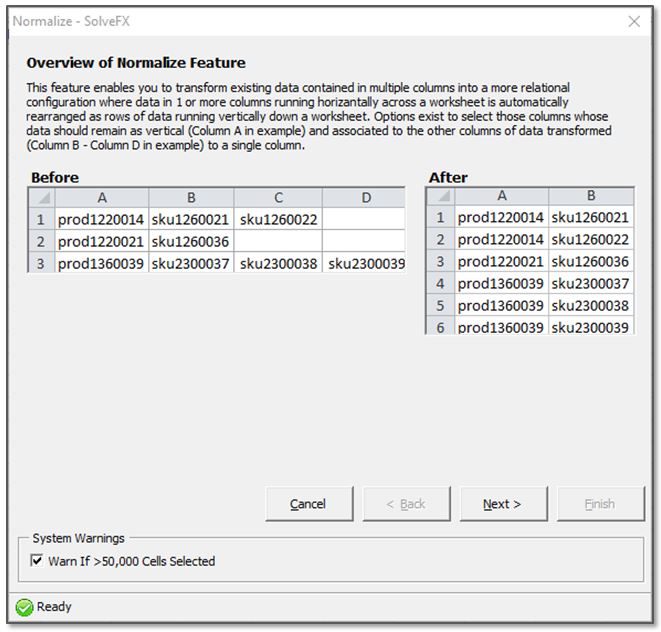
The Normalize feature automates the process of re-arranging a range of cell content to more closely resemble that of a database. This feature uses the first column of data (or more columns of your choice) as the primary key and transforms all other column content into just a single column that is associated with the value(s) from the first column.
The following are before and after screen shots after applying one of the normalize options to illustrate this feature. In this example, the normalize feature re-arranges the data in the selected range of values or text $A$1:$D$3 to range $A$1:$B$6. In this example, column A is specified by the user as the column that contains the primary relationship to the values found in the remaining columns (e.g. Columns B-D). This feature then normalizes this information so that the data contained in columns B-D is transformed to a single column that still maintains the same primary relationship with the content in column A.
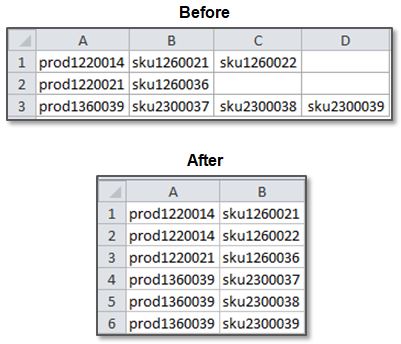
Normalize feature before and after example
The Normalize feature interface is designed as a wizard to step the user through the options available.
Step 1: Overview
This step provides a visual example and overview of the feature.
Step 1 of the normalize feature
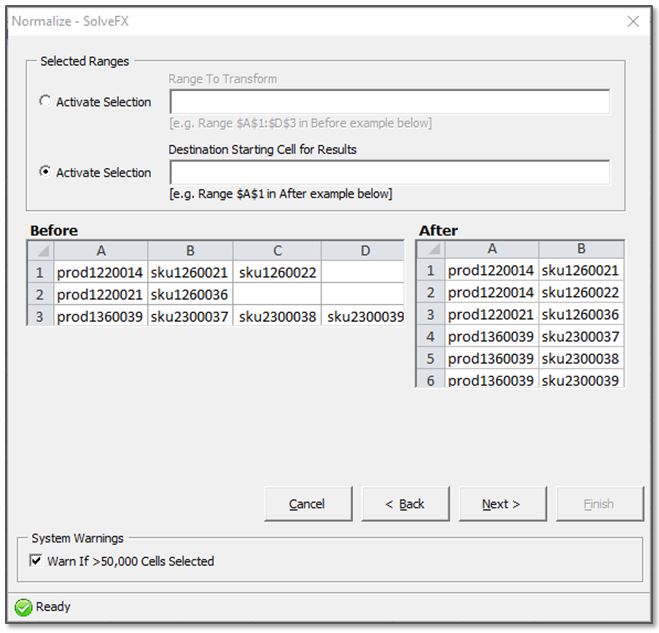
Step 2: Selected Ranges
This step provides the ability to define the original range containing the data to normalize and the intended destination starting cell for the results.
step 2 of the normalize feature
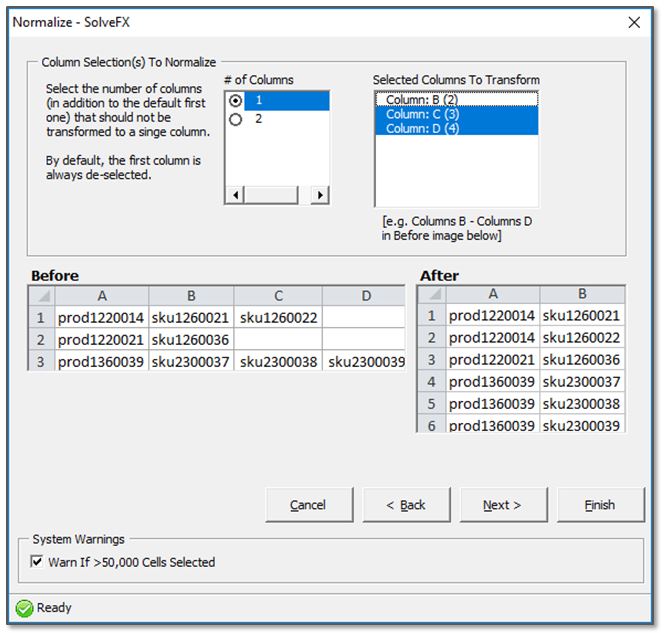
Step 3: Column Selection
This step provides the ability to define the number of columns that should be considered those that contain the primary relationship values.
step 3 of the normalize feature
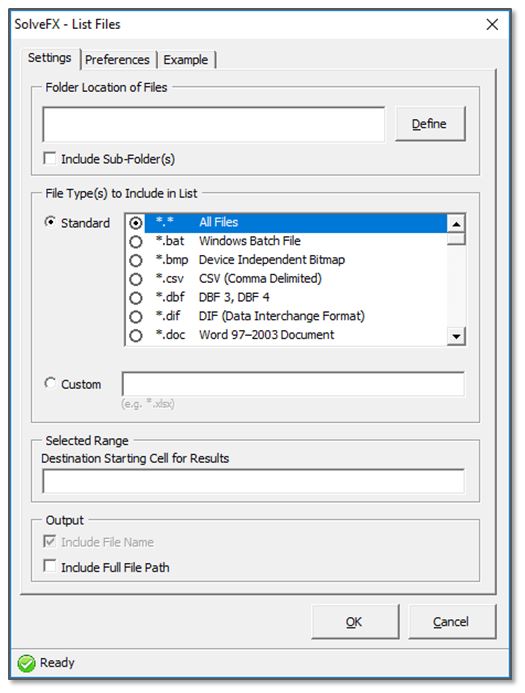
List Files
The List Files feature automates the process of copying the file names and file path (optional) of each file within a certain selected folder into a list within an Excel sheet. This feature also allows you to include all sub-folders within the folder selected.
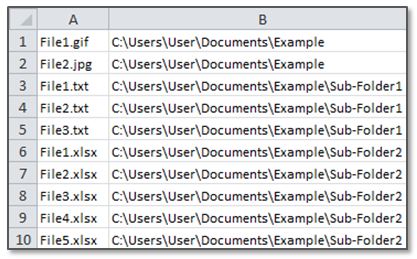
list files feature example results
The following is a screen shot of the List Files feature window. All the available options can be defined and saved as your default preference with the exception of the Selected Range.
The Custom file type option can be used to define a custom file type or a custom file name search. Using the Custom file type option, you can:
• Search for a custom file type
• Search for a specific file name of a file or files that are named containing a certain string of characters
list files feature screenshot
System Warnings and Saved Preferences
The SolveFX Utility is designed to have a common interface across most of its features. One of the shared features is the ability to save your recent selections for re-use the next time you use that same function.
Preferences
If selected, the Utility will save the current selected settings and make them available again the next time you use that feature. The setting is not enabled by default but can be changed. This setting is specific to each function.
System Warnings
If selected, the Utility will warn you if more than 50,000 cells are selected prior to processing that selected range. The setting is enabled by default but can be changed. Warnings can be ignored with the understanding that processing that large a range may take more time. This setting is specific to each function.
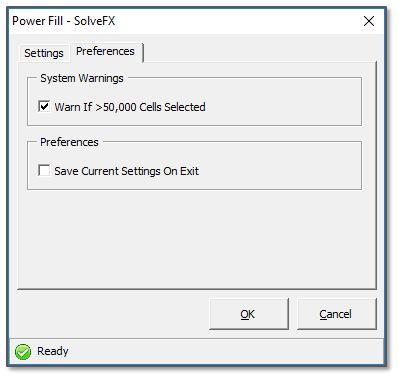
Preferences and warning options Available for each feature
Feature Examples
For more complex features, the SolveFX Utility contains build-in “Before” and “After” examples of how the feature works via an “Example” page within the feature itself.

example of the feature provided within the utility for quick reference
Replace Errors
The Replace Errors feature automates the process of finding and replacing errors with either a blank cell or a custom value. Options are available to replace only certain types of cell errors and you can select whether to include only error formulas, error values, or both in the replacement process. This feature also allows you to simply select all errors or select error types without replacement.
The following is a screen shot of the Replace Errors feature window. All the available options can be defined and saved as your default preference with the exception of the Selected Range.
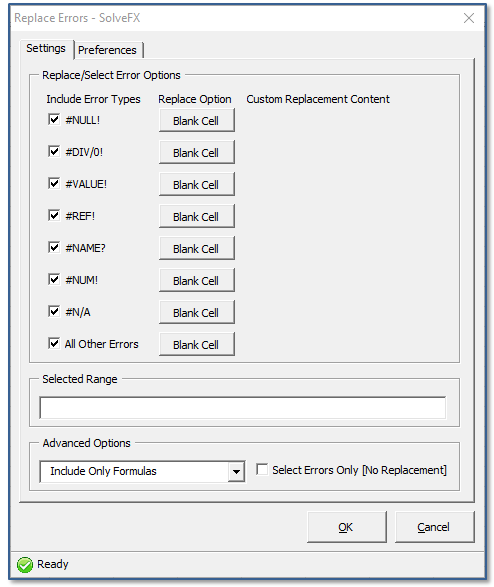
replace errors feature screenshot
To have Error Types selected only and not replaced, select the “Select Errors Only [No Replacement]” check box. One or more Error Types can be chosen to be Replaced or Selected. To replace Errors with a custom value or text, click the “Blank Cell” button next to each of the Error Type check boxes as shown in the example below. A text box will then be shown into which you would enter the replacement value.
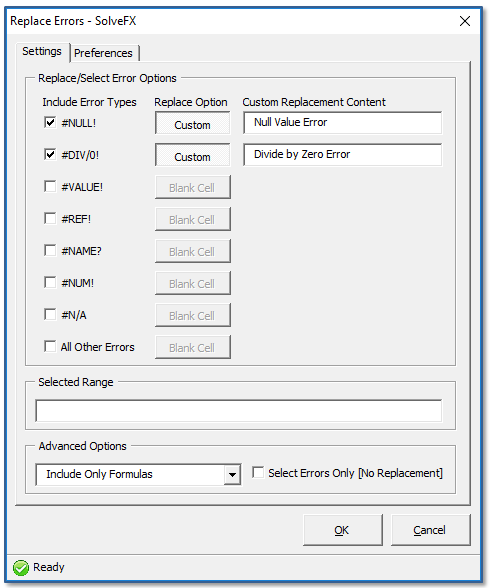
replace errors with custom values example screenshot
Rename Files
The Rename Files feature automatically renames files within a certain folder based on a selected file extension and defined naming convention. Options are available to define the starting sequence number. You can automatically add a sequence number to each existing file name or create a custom file name and sequence number to be applied to each qualifying file. There are 8 different file naming syntax to choice from.
- Original Name - Sequence
- Sequence - Original Name
- Custom Name - Sequence
- Sequence - Custom Name
- Original Name (x of y)
- (x of y) Original Name
- Custom Name (x of y)
- (x of y) Custom Name

rename files example screenshot
Web Data Entry
The Web Data Entry feature automates the process of completing large data entry tasks into a web page. This feature takes a range of Excel data and copies this data into a specified web page fields. Options exist to specify how the program navigates to the first data entry field and how it is to navigate between each of the fields on the web page to be completed.
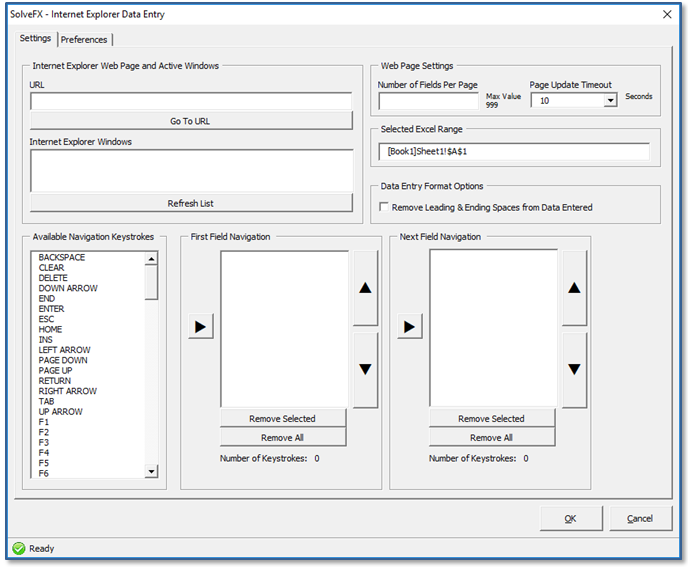
web data entry example screenshot
Power Select
Automates the process of multi-selecting non-contiguous cells that meet a user specified criteria such as a specific value or range of values, contain specific text, or have text of a certain length.
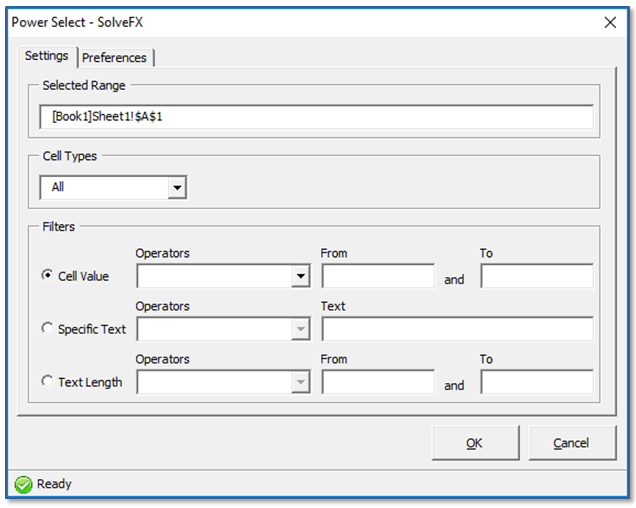
Power Select example screenshot
Filters
Cell Value – Use this option to select cells containing certain values. If the Selected Range contains cells with text, those text-only cells will be ignored. The numbers can be either positive or negative and can also contain decimals. The available Operators for cell value selection include the following:
- between
- not between
- equal to
- not equal to
- greater than
- less than
- greater than or equal to
- less than or equal to
Specific Text – Use this option to select cells containing specific text. If the Selected Range contains cells with numbers, those number-only cells will be ignored. The available Operators for specific text selection include the following:
- containing
- not containing
- beginning with
- ending with
The specific text entered to be found and selected is case sensitive. Any spaces entered as part of the text to be found will be considered as well.
Text Length - Use this option to select cells containing text of a certain length. If the Selected Range contains cells with numbers, those number-only cells will be ignored. The available Operators for text length selection include the following:
- between
- not between
- equal to
- not equal to
- greater than
- less than
- greater than or equal to
- less than or equal to
Merge Sheets
The Merge Sheets feature automates the process of consolidating worksheets from multiple open workbooks into a single new workbook. Options exist to include or exclude hidden worksheets or protected worksheets. You can also select those worksheets to include or exclude as well as determine the sort order of the worksheets in the new workbook created.

merge sheets example screenshot
Advanced Options:
- Sort Copied Sheets - Enables you to sort the copied worksheets in either ascending or descending order. The sort order of the worksheets is only applied to the new workbook created that contains all of the copied worksheets.
- Include Protect Sheets - By default, no protected worksheets are included in the Available Workbooks & Worksheets List. This option allows protected worksheets to be displayed in the Available Workbooks & Worksheets List and to be selected.
- Include Hidden Sheets - By default, no hidden worksheets are included in the Available Workbooks & Worksheets List. This option allows hidden worksheets to be displayed in the Available Workbooks & Worksheets List and to be selected.